Var2:
坑
github克隆源后,需要下载模型和权重,这个是简单的,重要的是环境。
本人喜欢用新的,最新py3.11,旧的也行,就是淘汰得早,第一步还是pip requirements.txt,如果没有写加速服务器的话,可以在后面加–index-url或-i(缩写) :
清华:https://pypi.tuna.tsinghua.edu.cn/simple
中国科技大学 https://pypi.mirrors.ustc.edu.cn/simple/
华中理工大学:http://pypi.hustunique.com/
山东理工大学:http://pypi.sdutlinux.org/
豆瓣:http://pypi.douban.com/simple/
阿里元:https://mirrors.aliyun.com/pypi/simple
pip install -r requirements.txt (-i http...)
pip install -r requirements.txt -i https://pypi.tuna.tsinghua.edu.cn/simple
但是如果用国内cdn加速的话,torch会给你下CPU版本,需要手动下载:
一般最新的N卡驱动都是cuda12以上的,看cuda的话下载nvitop(因为好看,不下可以用nvidia-smi命令):
pip install nvitop (-i http...)win没法直接用nvitop,查看cuda要用:
python -m nvitopcuda版本一般在右上角。
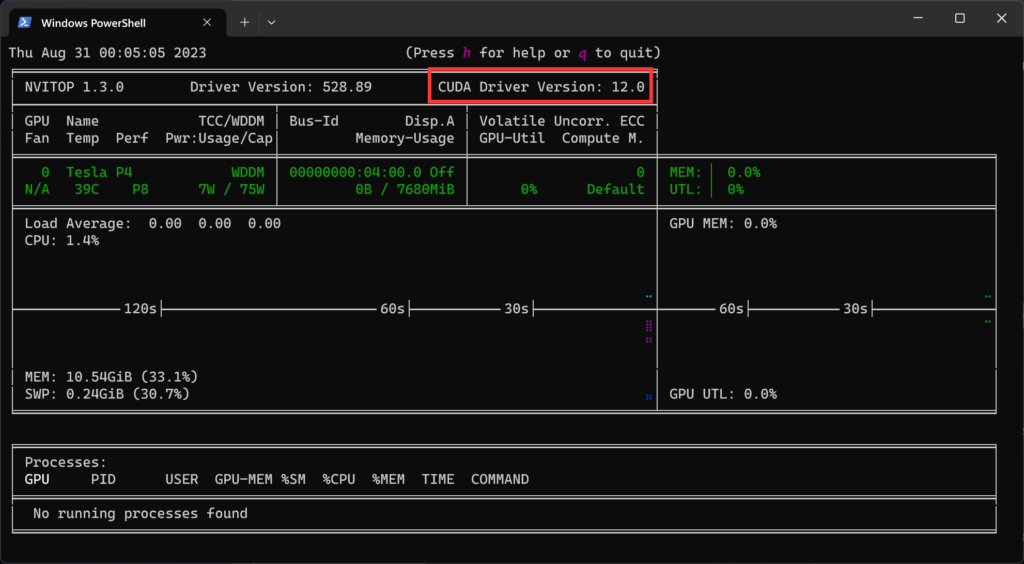
然后根据cuda版本下载对应的gpu torch,加粗的地方根据自己想用的cuda填写,一般cuda12是兼容cu11的,先要卸载第一步下载的torch:
pip uninstall torch torchvision torchaudio -ypip install torch torchvision torchaudio --index-url https://download.pytorch.org/whl/cu117
pip install torch torchvision torchaudio -i https://download.pytorch.org/whl/cu117
pip install torch torchvision torchaudio -i https://download.pytorch.org/whl/cu118
pip install torch torchvision torchaudio -i https://download.pytorch.org/whl/cu121
# ...然后transformers下载的版本太高,windows下也会报错,找不到模型,所以要下载低版本的,可以提前在requirements中改下版本号:
pip install transformers==4.26.1 (-i http...)然后这里附加一个查看torch调用cuda成功的方法:先进入python >>窗口
验证torch的版本、以及torch与cuda版本是否对应、cuda是否可用、以及torch对应的cuda的版本
import torch
print(torch.__version__)
print(torch.cuda.is_available())
也可查看可行的cuda数目:
print(torch.cuda.device_count())
查看torch对应的cuda版本:
torch.version.cuda
最终,我只想说:AI终究是烧钱的东西,普通人少碰。
cpu搞起来:
cpu搞的话:
.cuda()改成.float()将openai_api.py文件中3处
chunk.json(exclude_unset=True, ensure_ascii=False)替换为
chunk.model_dump_json(exclude_unset=True,exclude_none=True)流程:
装好git
1、下载框架,这里用国内的镜像站gitee:
git clone https://gitee.com/mirrors/chatglm2-6b.git2、在下载的目录中创建/THUDM/文件夹,并在文件夹内下载模型,这里用国内的镜像站modelscope:
git clone https://www.modelscope.cn/ZhipuAI/chatglm2-6b.git # fp16的
git clone https://www.modelscope.cn/ZhipuAI/chatglm2-6b-int4.git # 跑不动fp16的可以下int4的
3、在框架下修改requirements.txt中transformers版本号:
transformers==4.26.14、可以用conda管理py包,创建环境,这里选择py3.10.11:
conda create -n chatglm2 python=3.10.11
conda activate chatglm2
(chatglm2) pip install -r requirements.txt -i https://pypi.tuna.tsinghua.edu.cn/simple
5、确认自己是cpu还是gpu,调整*.py的代码和pip包,最后根据需要运行:
(chatglm2) python ().pyVar3:
坑
cpu运行的话,修改py文件:
.eval()改成float()
gpu改成cpu
Linux下注意要删除chatglm3-6b模型内tokenizer_config.json中的以下字段,不然会报错

流程
1、下载框架,这里用国内的镜像站gitee:
git clone https://gitee.com/mirrors/chatglm3.git2、这里以openapi为例,进入/openai_api_demo/目录,看到api_server.py文件中用到了两个模型,大语言模型和向量模型:
# set LLM path
MODEL_PATH = os.environ.get('MODEL_PATH', 'THUDM/chatglm3-6b')
TOKENIZER_PATH = os.environ.get("TOKENIZER_PATH", MODEL_PATH)

# set Embedding Model path
EMBEDDING_PATH = os.environ.get('EMBEDDING_PATH', 'BAAI/bge-large-zh-v1.5')那么两个都下载,创建/THUDM/文件夹和/BAAI/文件夹,分别在里面下载模型,用modelscope镜像站下载:
# THUDM目录下:
git clone https://www.modelscope.cn/ZhipuAI/chatglm3-6b.git
# BAAI目录下:
git clone https://www.modelscope.cn/AI-ModelScope/bge-large-zh-v1.5.git
3、如果是CPU运行则需要调整api_server.py文件中的代码:
# 526行
model = AutoModel.from_pretrained(MODEL_PATH, trust_remote_code=True, device_map="auto").eval()
# 改为
model = AutoModel.from_pretrained(MODEL_PATH, trust_remote_code=True, device_map="auto").float()

# 529行
embedding_model = SentenceTransformer(EMBEDDING_PATH, device="cuda")
# 改为
embedding_model = SentenceTransformer(EMBEDDING_PATH, device="cpu")
4、创建conda虚拟环境运行:
conda create -n chatglm3 python=3.11.4
conda activate chatglm3
(chatglm3) pip install -r requirements.txt -i https://pypi.tuna.tsinghua.edu.cn/simple

# 进入/openai_api_demo/目录运行
(chatglm3) python api_server.py
5、创建快捷运行批处理:
call C:\Users\admin\anaconda3\Scripts\activate.bat C:\Users\admin\anaconda3
call conda activate chatglm3
cd /d D:\ChatGLM3-6B\chatglm3\openai_api_demo
python api_server.py
pause
多显卡支持
    model = AutoModel.from_pretrained("THUDM/chatglm2-6b", trust_remote_code=True).float()
    # 多显卡支持,使用下面两行代替上面一行,将num_gpus改为你实际的显卡数量
    from utils import load_model_on_gpus
    model = load_model_on_gpus("THUDM/chatglm2-6b", num_gpus=2)